Showing posts with label CQ5. Show all posts

Thursday, August 4, 2016

AEM6 | Integration with Translations.com

Translations.com's GlobalLink Project Director integrates with Adobe Experience Manager, providing users with a powerful solution to initiate, automate, control, track, and complete all facets of the translation process.


Refer the following links for more details-
http://www.translations.com/products/globallink-AEM-adaptor,
http://www.translations.com/globallink/partners/adobe.html

Translations.com provide packages (in Zip farmat) which can be installed through AEM package manager. They provide two packages- 

a.       GlobalLink-Adaptor-4.7.6.zip (Check the latest packages from TDC site)

b.      GlobalLink-Workflows-2.1.zip (Check the latest packages from TDC site)

Please note that this is not an open source product and you need to contact to TDC to get these packages. Once packages installed, required page templates will be available. Look at the screenshot below-


You need to create pages for each template under /content/global-link (Their latest Adaptor package doesn't need this activity. Their configuration is available from /projects.html page of the AEM instance)-


Configuring Translation.com

First add the new Translation vendor to Translation configurations-


  • On the rail, click or tap Tools > Operations > Cloud > Cloud Services.
  • In the Adobe Marketing Cloud/Translation Integration area, click or tap Show Configurations.
  • Click the + link next to Available Configurations.
    file
  • Type a title for your configuration. The title identifies the configuration in the Cloud Services console as well as in page property drop-down lists. The default name is based on the title. Optionally, type a name to use for the repository node that stores the configuration. 
  • Click Create.
  • On the configuration page, click Edit.
  • On the Translation Integration Configuration tab, select the translation provider, and select the category to use for translating the content.  
  • (Optional) On the User Generated Content tab, select the repository node where the original user-generated content and the translations are stored.
  • Click OK.

  • Now, Go to the Adaptor configuration page in AEM- http://localhost:4502/content/global-link/globallink-adaptor-configuration.html and enter required details for TDC web service URL, account user name, password etc. Screen also asks you to define a language key mapping and properties to include for translation.

    Scheduling Translations

    I am taking here an example of Asset's description metadata field. To submit asset's “description” metadata for translation, follow below steps-

    2. Fill in required details.  Click on the “Find Metadata” button; it will show up the result assets available for translation. Only those assets will be listed which have description property set.
    3.       Expand the asset(s), and check the metadata fields need to be send for translation. Next, move to the “Target Languages” drop-down and select the desired languages. Click on the “Start Workflow” button to initiate the translation workflow. Look at the screenshot below-


    4.       After this, go to TDC submission list page to check status- http://localhost:4502/content/global-link/globallink-adaptor-submissions-list.html

    Verifying Translation

    Translation workflow will update node properties sent for translation with translated text automatically once response is received.

    In order to display translation in front end, you can customize AEM UI to show translated data. In this example I will add a new tab named "Alt Text Translation" to show all Alttext translations to the author. 


    Select "Default" (You can pick image, forms etc. depending on your requirement) and Click on pencil icon to edit it. 

    1. Use the "+" icon next to tags in left hand screen to add a new tab- "Alt Text Translation"
    2. Use the "Build Form" in right hand screen to add language fields.

    Look at the below snapshot on how should it look-


    Once you have saved the metadata template, you can go to Asset Properties from Assets section. The properties section will look like this-


    Note: This article is based on integration of an older version of Translations.com Global Link Adaptor. While working with new adapter version, all above steps may not be required.

    Monday, August 1, 2016

    XSS Protection in AEM6

    XSS (Cross Site Scripting) protection in AEM to  prevent attackers to inject code into web pages viewed by other users, is based on AntiSamy Java library provided by OWASP (Open Web Application Security Project). Due to this sometime you may get following kind of errors:
    org.apache.sling.xss.impl.HtmlToHtmlContentContext AntiSamy warning: The iframe tag contained an attribute that we could not process. The src attribute had a value of "some-non-xss-standard-iframe-url". This value could not be accepted for security reasons. We have chosen to remove this attribute from the tag and leave everything else in place so that we could process the input.

    Most basic configurations for XSS protection is configured out of the box. In case you need to happen to change this, you can override these configurations but do it carefully because these configurations apply globally. The default AntiSamy configuration can be found at following location in AEM- /libs/cq/xssprotection/config.xml. For reference, XSS rules are defined like this:
    <!-- START: Additions for oembed inserts -->
    <regexp name="iframesrc" value="^(http:|https:)?\/\/(www\.)?(((youtube|youtube-nocookie|vimeo|player\.vimeo|dailymotion|instagram|tumblr|twitter|wordpress|facebook|wikipedia|stackoverflow)(\.com))|(flickr\.com|flic\.kr))\/([A-Za-z0-9]).*"/>
    <!-- END: Additions for oembed inserts -->

    This article categorizes the protection mechanism into two parts-

    1. Code Level Protection

    A. Use the features/ methods provided by XSS API in you AEM application JSP, Servlets, Services etc. while processing user inputs, page selectors etc. XSS API provides two type of features- encoding and validation. In general, validators are safer than encoders. Encoding only ensures that content within the encoded context cannot break out of said context. It requires that there be a context (for instance, a string context in Javascript), and that damage cannot be done from within the context (for instance, a javascript: URL within a href attribute.

    In Java code-
    import com.adobe.granite.xss.XSSAPI;
    import org.apache.sling.api.resource.ResourceResolver;
    
    public class UserInput {
      public String getFilteredURL(ResourceResolver resolver, String userInputText) {
        XSSAPI xssAPI = resolver.adaptTo(XSSAPI.Class);
        return xssAPI.getValidHref(userInputText);
      }
    }
    

    In JSP Code-
    <%@ include file="/libs/foundation/global.jsp" %><%
    %><%
        String siteTitle = request.getParameter("siteTitle");
        String websiteLink = request.getParameter("websiteLink");
    %>
    <html>
        <head>
            <title>
                <%= xssAPI.encodeForHTML(siteTitle); %>
            </title>
        </head>
        <body>
            <a href="<%= xssAPI.getValidHref(websiteLink); %>">Website Link</a>
        </body>
    </html>
    

    B.
    Sightly takes care of XSS prevention itself by virtue of it's framework architecture. This means that all HTML values and attributes are subject to XSS check before they are rendered by server. If you have to explicitly bypass this restriction then you need to use context="unsafe". But be very careful when you decide to do that beacause it disables escaping and XSS protection completely for the applied element which can cause security issues.

    2. Server Level Protection

    A web application firewall, such as mod_security for Apache should be used/ configured on dispatcher to make it more reliable.

    Following rules may come handy to you in security.conf at your dispatcher-

    # Disable cross site scripting

    RewriteCond %{QUERY_STRING} (\<|%3C).*script.*(\>|%3E) [NC,OR]
    RewriteCond %{QUERY_STRING} ^.*(<|%3C).*script.*(>|%3E).*
    RewriteRule .* /errors/404.html
    RewriteRule .* - [F]
    

    # Disable SQL Injection

    RewriteCond %{QUERY_STRING} ^.*(localhost|loopback|127\.0\.0\.1).*    [NC,OR]
    RewriteCond %{QUERY_STRING} ^.*(\*|;|<|>|'|"|\)|%0A|%0D|%22|%27|%3C|%3E|).* [NC,OR]
    RewriteCond %{QUERY_STRING} ^.*(;|<|>|'|"|\)|%0A|%0D|%22|%27|%3C|%3E|).*(/\*|
    union|select|insert|cast|set|declare|drop|update|md5|benchmark).* [NC]
    RewriteRule ^(.*)$ - [F,L]
    

    # Disable Clickjacking

    Header always append X-Frame-Options SAMEORIGIN

    # Disable unwanted HTTP Methods

    RewriteEngine on
    RewriteCond %{REQUEST_METHOD} ^TRACE [NC]
    RewriteRule .* - [F]
    RewriteCond %{REQUEST_METHOD} ^TRACK [NC]
    RewriteRule .* - [F]
    RewriteCond %{REQUEST_METHOD} ^DELETE [NC]
    RewriteRule .* - [F]
    RewriteCond %{REQUEST_METHOD} ^OPTIONS [NC]
    RewriteRule .* - [F]
    RewriteCond %{REQUEST_METHOD} ^PUT [NC]
    RewriteRule .* - [F]
    
    Sources:
    1. https://docs.adobe.com/docs/en/aem/6-0/administer/security/security-checklist.html
    2. http://tostring.me/270/how-to-prevent-cross-site-scripting-xss-attack-on-your-adobe-cq-based-web-application/

    Thursday, July 28, 2016

    AEM Troubleshooting/ Useful Links

    Sharing few utility tools/ links-

    1. To find the generated java files in AEM6.1

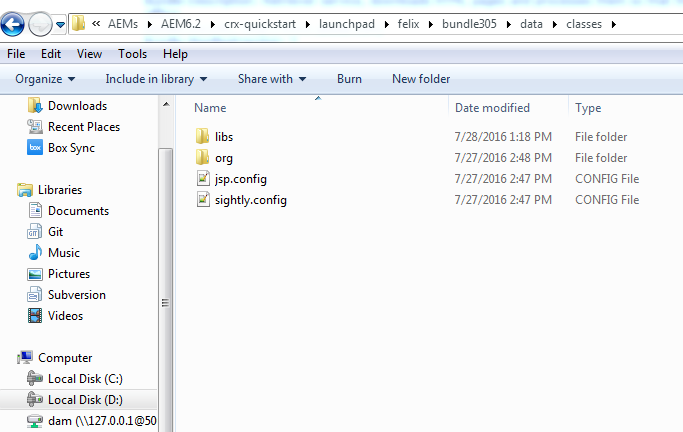
    Generated JSP JAVA files used to be at -  /var/classes location but AEM6.1 on wards it's no longer present there. This is due to change of repository ClassLoader, now it uses FSClassLoader (File System ClassLoader) for better performance and throughput.

    Generated JSP java files are located at- [AEM_INSTALL_DIR]/crx-quickstart/launchpad/felix/bundle[BUNDLE_ID]/data/classes


    Source: For details read following article - http://labs.6dglobal.com/blog/2015-06-23/new-apache-sling-fs-classloader-console/

    2. Dependency finder- 

    Use the following link to know the maven dependency for a package-http://localhost:4502/system/console/depfinder

    3. Rebuilding clientlibs-

    Use following link to rebuild Client Libraries for CSS and JS-
    http://localhost:4502/libs/granite/ui/content/dumplibs.rebuild.html?rebuild=true


    4. Reecompile JSP

    Use following link to recompile all generated JSP Java files-
    http://localhost:4502/system/console/slingjsp 

    5. Auto Deploy UI Package


    mvn clean install -PautoInstallPackage

    For publish-  mvn clean install -PautoInstallPackagePublish -Daem.publish.host=localhost -Daem.publish.port=4503

    6. Auto Deploy Java Package


    mvn clean install sling:install


    7. Accessing repository through WebDav for Bulk uploads

    Following link describes detailed steps on how to access the AEM repository through WebDav-
    http://labs.6dglobal.com/blog/2016-05-11/webdav-transfers/

    8. AEM Companion App:

    Alternative to WebDav you can use AEM Companion App for Desktops. It is very helpful for managing DAM Assets directly from your system. Here is the link for documentation-
    https://docs.adobe.com/docs/en/aem/6-1/administer/integration/companion-app.html

    9. Grunt Integration with AEM-Maven Project

    http://labs.6dglobal.com/blog/2016-07-21/using-grunt-in-aem-maven/

    10. Monitoring/ Reporting

    Go to- http://localhost:4502/miscadmin#/etc/reports. Following tools are available- 

     11. Bulk Editor/ Searching pages based on Parameters

    12. Checking log files

    system/console/slinglog/tailer.txt?tail=500&name=/logs/error.log

    Tuesday, July 26, 2016

    SDI Integration to render dynamic content through web server

    Below are the steps to integrate Sling Dynamic Include in your project:

    1. Download the source code from- https://github.com/Cognifide/Sling-Dynamic-Include and put it in a folder
    2. Run a mvn clean install command in the folder containing pom.xml
    3. Go to the target folder and pick the created jar file (so generated SDI jar)
    4. Install the bundle in AEM OSGi or placeit in your project install folder
    5. Follow the steps given at- https://github.com/Cognifide/Sling-Dynamic-Include

    Changing Default AEM login background image

    Default AEM login screen is rendered using the login component located at - /libs/cq/core/components/login path. If you need to change anything in login UI, you need to overlay this structure and make changes as desired. One such use case is changing the background image of the default login page.

    Look at the following file in CRXDE Lite - /libs/cq/core/components/login/login.jsp

    You will see that the background image is defined here-

    If you just want to change the background image then overlay the path - /libs/cq/core/content/login/bg/background.png for your project. and place your background.png in the overlayed location in /apps/.

    Thursday, July 21, 2016

    AEM6 | Export Users/ Groups with ACL Permissions

    If you need to transfer users and groups in  AEM from one server to another or from one AEM instance to another then you need to create a package of users/groups along with rep:policy nodes. It is important to include rep:policy nodes as the permissions are stored at the individual target nodes instead of group/ user node. We need to Include all individual rep:policy nodes where you have given access to groups.

    If users are included in the package then :
    Add Exclude rule to users for token: /home/users/.*/.tokens

    The Recommended option is to use acs-aem-commons tool to create a separate ACL package to migrate the ACLs. This utility picks the rep:policy nodes automatically so we don't have to worry about it.

    Follow the below steps :

    1. Create the ACL package as shown below -


    2. Configure the ACL package

    Once package is created open the ACL package page and configure it for groups and users definition.
    While configuring package, it is important that you select all the principles i.e. users or groups which you want to export under "Principal Names". You can keep the "Include Patterns" field blank to ensure that all nodes which have rep:policy node are included automatically. You don't have to include them selectively because doing that may be cucumbersome and  there are chances you may miss few entries.


    You need to check "Include principles" option if the selected principals do not exist in target environment otherwise you can keep it unchecked.

    Set ACL Handling to overwrite (or Merge**)
    **In case the "overwrite" does not work for you, try with "merge" option.

    3. Install the package in destination AEM instance

    Note :- I suggest to perform/ verify this in a test instance first. Ensure you take back of existing User/group definitions before you upload the package in destination AEM instance.

    Troubleshooting: 

    Once you have installed the package in destination, cross verify the users, groups and permission. Make changes in your filter definition in Step 1 as required if you see any issues and build/ install again.
    In case the permissions does not reflect properly, check if you have given the permission at root level i.e. selecting the check all option at the top. Sometimes this give issue so instead of giving permissions at root level, give permissions at sub root level i.e. /content, /etc, /home, /libs etc.


    Sunday, July 17, 2016

    AEM6 | Compatible Audio Codec for MP4 video

    If you want to support mp4 video in AEM then you need to add "libfdk-aac" as audio codec profile in AEM . Just install "libfdk-aac" encoder with FFMPEG. This encoder provides "AAC" audio codec which runs by default on IE , Chrome and Safari browser.

    Thursday, July 7, 2016

    Performance Tuning in AEM6


    1. Tuning the Sling Job Queues
    The bulk upload of large assets may be very resource intensive. By default the number of concurrent threads per job queue is equal to the number of CPU cores, which may cause an overall performance impact and high java heap consumption.  It is recommended to not exceed 50% of the cores. To change this value, go to : http://<host>:<port>/system/console/configMgr/org.apache.sling.event.jobs.QueueConfiguration and set queue.maxparallel to a value representing 50% of the CPU cores of the server hosting your AEM instance (eg. for 8 CPU cores, set the value to 4). 

    2. Create custom oak indexes for all frequently used search queries.
    a) Analyze slow queries
    b) Create the custom indexes under the oak:index node for all search properties
    c) For each custom Lucene-based index, try to set includedPaths
    d) Make use of guessTotal when querying large data sets in the application code.
    e) Cache the search results JSON using a selector-based URL approach

    Following links may help-
    Oak index generator utility: will generate an index definition from a search query

    Granite query performance monitor:

    Granite search index manager:

    Search index config docs:

    Another useful tool for search index developing and debugging:

    3.  JVM parameters
    Prevent expansive queries from overloading the systems:-
    -Doak.queryLimitInMemory=500000 (see also the Oak documentation)
    -Doak.queryLimitReads=100000 (see also the Oak documentation)
    -Dupdate.limit=250000
    -Doak.fastQuerySize=true

    4. Lucene index configuration:
    Open /system/console/configMgr/org.apache.jackrabbit.oak.plugins.index.lucene.LuceneIndexProviderService and
    enable CopyOnRead
    enable CopyOnWrite
    enable Prefetch Index Files

    5.  Externalize the Data Store
    If you are using AEM Assets or have an AEM application that heavily uses binary files then it is recommended to use an external datastore. 

    6. TAR off-line compaction only
    As per Adobe on line compaction provides high-performing and healthy AEM environment but may cause rapid repository growth. Currently Adobe currently recommends to use the offline compaction, via the oak-run tool as documented under http://docs.adobe.com/docs/en/aem/6-0/deploy/upgrade/microkernels-in-aem-6-0.html#Maintaining the Repository

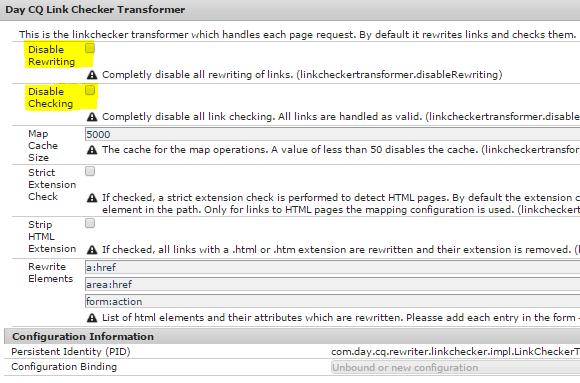
    7. Disable Link Checker
    If your project requirement does not need checking links on your pages then disable the link checker option from OSGi console-


    Otherwise, follow the below link to figure out if it is causing any issue-

    8. Settings for windows servers
    If you are using windows server then look at the following link to figure out if any extra thing is required-
    https://helpx.adobe.com/experience-manager/kb/high-memory-usage-aem-6.html

    9. Avoid AEM crash during large asset upload
    Follow the below link - https://helpx.adobe.com/experience-manager/kb/cqbufferedimagecache-consumes-heap-during-asset-uploads.html

    10. IE Specific Tuning
    If you support authoring in IE then following article may help you-
    http://aem6solutions.blogspot.in/2016/06/aem6-image-upload-issue-in-internet.html


    Thursday, June 30, 2016

    AEM6 | Customize create page wizard

    To customize OOTB create page wizard you should perform following step(s) depending on the type of customization you are looking for-

    1. Customize the template fields shown in wizard step-2

    First, you need to override the cq:dialog of page component to configure what fields should be shown in create page wizard. In this dialog set the following property to true which you want to display in page create wizard-


    cq:showOnCreate
    Boolean
    true


    2. Customize the template selection step in wizard step-1

    You need to write a clientlib file with following code to handle the template selection step-

    This example explains how to auto select the template if only one template is available for selection-
    $(document).on("foundation-contentloaded", function(e) {
        if (($(".foundation-collection-item").length==1) && ($(".foundation-collection-item.selected").length == 0)) {
            $('.foundation-collection-item').click();
            $(':button.coral-Wizard-nextButton').click(); 
        }
    });

    Category of the clientlibs can be any of this depending on your requirement- 
    app.myproject.createpagewizard, cq.gui.siteadmin.admin.publishwizard, dam.gui.admin.publishassetwizard

    In order to attach this new clientlibs to create page wizard, you need to overlay the wizard's head component and add your custom category i.e. "app.myproject.createpagewizard" as shown in below diagram-


    3. Customize the confirmation Step-3

    Once you have submitted the create page form, there comes a popup window for confirmation, if you want to modify the form submit behavior then you can do following customization-

    (function(window, document, Granite, $) {
        "use strict";
        var ui = $(window).adaptTo("foundation-ui");

        function createPage(wizard) {
            $.ajax({
                type: wizard.prop("method"),
                url: wizard.prop("action"),
                contentType: wizard.prop("enctype"),
                data: wizard.serialize()
            }).done(function(html) {
                var $html = $(html);
                var edit = $html.find("a.cq-siteadmin-admin-createpage-edit");
                window.location = edit.prop("href");
            }).fail(function(xhr, error, errorThrown) {
                if (error === "error") {
                    var $html = $(xhr.responseText);
                    if ($html.find(".foundation-form-response-status-code").length > 0) {
                        var title = $html.find(".foundation-form-response-title").next().html();
                        var message = $html.find(".foundation-form-response-description").next().html();
                        ui.alert(title, message, "error");
                        return;
                    }
                }
                ui.alert(error, errorThrown, "error");
            });
        }

        function submit(wizard) {
            var flag = true;
            if (flag == true && (wizard.prop("template").value.indexOf("/apps/myproject/templates/testTemplate") >= 0)) {
                $.ajax({
                    url: "/bin/someservletpath/submit",
                    method: "GET",
                    data: {
                        url: wizard.prop("parentPath").value,
                        pageTemplate: wizard.prop("template").value
                    },
                    dataType: "html"
                }).done(function(res) {
                    wizard.prop("parentPath").value = res;
                    createPage(wizard);
                }).fail(function(res) {
                    ui.alert(res, "error");
                });
            } else {
                createPage(wizard);
            }
        }

        $(document).on("submit", ".cq-siteadmin-admin-createpage", function(e) {
            e.preventDefault();
            submit($(this));
        });

    })(window, document, Granite, Granite.$);

    As mentioned in #2 above the category of clientlibs should be "app.myproject.createpagewizard" and associated to create page wizard via head component overlaying.

    CDN | Clearing Cloudflare cache

    In order to clear Cloudflare cache automatically via code, follow below steps: 1. Develop Custom TransportHandler Develop a custom Trans...