Showing posts with label Customization. Show all posts

Tuesday, November 5, 2024

Version Issue with Custom AssetMetadataPermissionProvider implementation

While implementing custom metadata based permission provider, you can follow this article to implement it. One issue I faced during this implementation that the version access was not working. To fix this modify below methods:

@Override

public TreePermission getTreePermission(Tree tree, TreePermission parentPermission) {

if (PermissionHelpers.isDamPath(tree) || PermissionHelpers.isDamAncestorPath(tree)) {

if (PermissionHelpers.findAncestorAsset(tree) != null) {

return PermissionHelpers.isAncestorAssetOwner(tree, principalNames) ?

             TreePermission.ALL : parentPermission;

} else {

return new EmptyAssetMetadataTreePermission(tree, TreeType.DEFAULT, this);

}

} else if (tree.getPath().startsWith("/" + JcrConstants.JCR_SYSTEM)) {

      // This condition added to allow version to path access

      // This is just an example code, optimize this condition before you use

return TreePermission.ALL;

}

return TreePermission.NO_RECOURSE;

}

Another method:

@Override

public boolean isGranted(Tree tree, PropertyState property, long permissions) {

TreeType type = treeTypeProvider.getType(tree);

switch (type) {

case HIDDEN:

return true;

case VERSION:

Tree evalTree = getEvaluationTree(tree);

if (evalTree == null) {

return false;

}

if (evalTree.exists()) {

return internalIsGranted(evalTree, property, permissions);

} else {

return false;

}

case INTERNAL:

return false;

default:

return internalIsGranted(tree, property, permissions);

}

} 

Core logic to test metadata conditions to meet business requirement is put in the below private method which is called in the above isGranted method.

private boolean internalIsGranted(@NotNull Tree tree, @Nullable PropertyState property,

   long permissions) {

boolean answer = false;

if (PermissionHelpers.isAncestorAssetOwner(tree, principalNames)) {

answer = true;

}

if (property != null) {

LOG.debug("isGranted: {}@{} ({}) = {}", tree.getPath(), property.getName(),

             permissions, answer);

} else {

LOG.debug("isGranted: {} ({}) = {}", tree.getPath(), permissions, answer);

}

return answer;

}

PermissionHelpers here is a general utility class like below:


Monday, September 11, 2017

Custom userpicker to select users from a specific group

If you need to customize the userpicker component to allow users to pick a particular user from a specific group, you have to extend the OOTB userpicker component. It uses the UserManager service instance to get the group authorizable and retrieve the group members using getMembers() method thereafter. Refer the sample code for this purpose-


Workflow Customizations | Touch UI

The Scribcopia blog article is a good reference to start with workflow customization in touch UI. In this article, I am going to describe few additional steps which help you to perfect the authoring behavior.

1. Handling Validation of additional fields in start workflow dialog

You need to add in custom java-script clientlibs file with category- "cq.authoring.editor.core,cq.authoring.editor" (Obviously, the two categories will be added separately in your categories multifield property of your clientlibs.)

Below is the sample code to refer on what events you need to handle in your client library code. You need to change it as per your business requirements.

Below things are done in this code:

  • If author selects your custom workflow model- Show additional fields and disable the submit button in order to stop submitting the form without filling the mandatory field(s).
  • The second part of code handles enabling/ disabling of the workflow start button based on author filling out the mandatory field(s).

2. Adding additional fields in start workflow dialog

Please note that the custom class selectors for the additional fields are added in startworkflow.jsp file as mentioned in the Scribcopia blog post. Below is the sample code for the same:

Here two fields are added one of which reviewer is mandatory and the other is scheduled publish time.

3. Customizing User picker drop-down

If you happen to customize the user picker for your reviewer user picker drop-down based on a specific user group, refer this blog post- Group based userpicker.

Thursday, June 30, 2016

AEM6 | Customize create page wizard

To customize OOTB create page wizard you should perform following step(s) depending on the type of customization you are looking for-

1. Customize the template fields shown in wizard step-2

First, you need to override the cq:dialog of page component to configure what fields should be shown in create page wizard. In this dialog set the following property to true which you want to display in page create wizard-


cq:showOnCreate
Boolean
true


2. Customize the template selection step in wizard step-1

You need to write a clientlib file with following code to handle the template selection step-

This example explains how to auto select the template if only one template is available for selection-
$(document).on("foundation-contentloaded", function(e) {
    if (($(".foundation-collection-item").length==1) && ($(".foundation-collection-item.selected").length == 0)) {
        $('.foundation-collection-item').click();
        $(':button.coral-Wizard-nextButton').click(); 
    }
});

Category of the clientlibs can be any of this depending on your requirement- 
app.myproject.createpagewizard, cq.gui.siteadmin.admin.publishwizard, dam.gui.admin.publishassetwizard

In order to attach this new clientlibs to create page wizard, you need to overlay the wizard's head component and add your custom category i.e. "app.myproject.createpagewizard" as shown in below diagram-


3. Customize the confirmation Step-3

Once you have submitted the create page form, there comes a popup window for confirmation, if you want to modify the form submit behavior then you can do following customization-

(function(window, document, Granite, $) {
    "use strict";
    var ui = $(window).adaptTo("foundation-ui");

    function createPage(wizard) {
        $.ajax({
            type: wizard.prop("method"),
            url: wizard.prop("action"),
            contentType: wizard.prop("enctype"),
            data: wizard.serialize()
        }).done(function(html) {
            var $html = $(html);
            var edit = $html.find("a.cq-siteadmin-admin-createpage-edit");
            window.location = edit.prop("href");
        }).fail(function(xhr, error, errorThrown) {
            if (error === "error") {
                var $html = $(xhr.responseText);
                if ($html.find(".foundation-form-response-status-code").length > 0) {
                    var title = $html.find(".foundation-form-response-title").next().html();
                    var message = $html.find(".foundation-form-response-description").next().html();
                    ui.alert(title, message, "error");
                    return;
                }
            }
            ui.alert(error, errorThrown, "error");
        });
    }

    function submit(wizard) {
        var flag = true;
        if (flag == true && (wizard.prop("template").value.indexOf("/apps/myproject/templates/testTemplate") >= 0)) {
            $.ajax({
                url: "/bin/someservletpath/submit",
                method: "GET",
                data: {
                    url: wizard.prop("parentPath").value,
                    pageTemplate: wizard.prop("template").value
                },
                dataType: "html"
            }).done(function(res) {
                wizard.prop("parentPath").value = res;
                createPage(wizard);
            }).fail(function(res) {
                ui.alert(res, "error");
            });
        } else {
            createPage(wizard);
        }
    }

    $(document).on("submit", ".cq-siteadmin-admin-createpage", function(e) {
        e.preventDefault();
        submit($(this));
    });

})(window, document, Granite, Granite.$);

As mentioned in #2 above the category of clientlibs should be "app.myproject.createpagewizard" and associated to create page wizard via head component overlaying.

Wednesday, June 15, 2016

AEM6 | RTE validator plugin

You can use the belowJS for sample validator plugin for Rich text editor-

CUI.rte.plugins.ValidatorPlugin = new Class({

    toString: "ValidatorPlugin",

    extend: CUI.rte.plugins.Plugin,

    /**
     * RTE plugin for maximun length check. If maxlength is set to 0 the validation will not happen. Set a number 
     * greater than 0 for maxlength property.
     */

    /**
     * @private
     */
    alertShown: false,
    errorEl: null,

    /**
     * @private
     */
    _init: function(editorKernel) {
        this.inherited(arguments);
        editorKernel.addPluginListener("beforekeydown", this.handleKeyDown, this, this,
            false);
        editorKernel.addPluginListener("keyup", this.handleKeyUp, this, this,
            false);
        editorKernel.addPluginListener("paste", this.handlePaste, this, this.editContext,
            false);
    },
    handlePaste: function(e, ctx) {
        var k = e.nativeEvent;
        var newtext, existingText, isIE;
        var clp = (k.originalEvent || k).clipboardData;
        var ek = this.editorKernel;
        existingText = $(e.editContext.root).context.textContent;
        if (clp === undefined || clp === null) {
            newtext = window.clipboardData.getData('Text');
            isIE = true;
        } else {
            newtext = clp.getData('text/plain');
            isIE = false;
        }

        var fulltext = existingText + newtext;
        //console.log("hi");
        //console.log("Existing: " + existingText);
        console.log("value: " + fulltext);
        var len = fulltext.length;
        if (len > this.config.maxlength && this.config.maxlength != 0) {

            this.showError(ek, "Maximum character limit: '" + this.config.maxlength + "' reached!");
            $(e.editContext.root).context.textContent = fulltext.substr(0, this.config.maxlength);
            k.preventDefault();
        }
    },

    /**
     * Handles key strokes.
     * @param {Object} e The plugin event
     * @private
     */
    handleKeyDown: function(e, k) {
        //Don't handle delete, backspace and arrow clicks
        if (e.isBackSpace() || e.isDelete() || e.isShift() || e.ctrlKeyPressed ||
            (e.charCode > 32 && e.charCode < 41)) {
            return;
        }
        var context = e.editContext;
        var dpr = CUI.rte.DomProcessor;
        var sel = CUI.rte.Selection;
        var com = CUI.rte.Common;
        var lut = CUI.rte.ListUtils;
        var ek = this.editorKernel;
        /* if(e.charCode==13)
         {
             debugger;

         }*/
        if (!this.isValidMaxLength(e, context)) {
            this.showError(ek, "Maximum character limit: '" + this.config.maxlength + "' reached!");
            e.preventDefault();
            return;
        }
    },
    showError: function(ek, message) {
        if (!this.alertShown) {
            ek.getDialogManager().alert(
                CUI.rte.Utils.i18n("Error"),
                CUI.rte.Utils.i18n(message),
                CUI.rte.Utils.scope(this.focus, this));
            this.alertShown = true;
        } else {}

    },

    /**
     * Handles post-processing required for all browsers. The method is called whenever a
     * key has been pressed.
     * @param {Object} e The plugin event
     * @private
     */
    handleKeyUp: function(e) {},
    isValidMaxLength: function(e, context) {
        if (this.config.maxlength == 0) {
            return true;
        }

        var length = context.root.textContent.length;
        var $contentEditable = $('#ContentFrame').contents().find('[contenteditable="true"]').length ? $('#ContentFrame').contents().find('[contenteditable="true"] p>br') : $('[contenteditable="true"] p>br');
        length += $contentEditable.length;
        if (length >= this.config.maxlength) {
            return false;
        }
        return true;
    },
    notifyPluginConfig: function(pluginConfig) {
        pluginConfig = pluginConfig || {};
        CUI.rte.Utils.applyDefaults(pluginConfig, {
            "maxlength": 0,

        });
        this.config = pluginConfig;
    }

});


//register plugin
CUI.rte.plugins.PluginRegistry.register("customvalidate", CUI.rte.plugins.ValidatorPlugin);


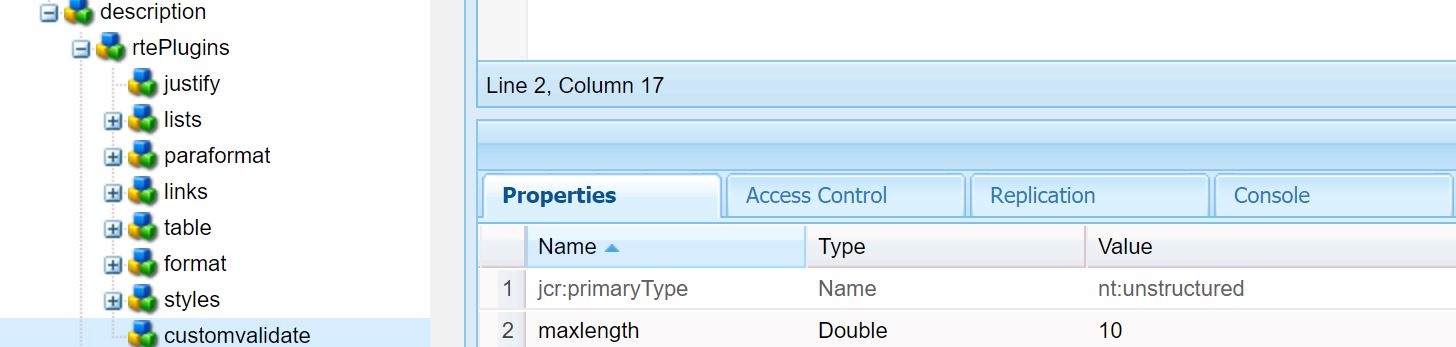
Put this js in a clientlibrary folder with category "cq.authoring.dialog".

After that in your component dialog, use the validator as shown below:


AEM6 | Tag field validation

As mentioned in previous post, AEM6 uses Coral UI framework for touch UI rendering. So if you need to implement field validation, you should register a validator on that field supported by Coral UI.

To implement validation on tag input field you can use the following sample code.


1. In your tagspicker input field add one property- tagsMessage (Set value to the validation message). Look at the screenshot below-


2. Create a clientLibs Folder with category- "cq.authoring.dialog" and add a JS file having following code-

;(function($, $document) {
    "use strict";
    $document.on("dialog-ready", function() {
        //Register Tag Field Validator
        $.validator.register({
            selector: "input.js-coral-pathbrowser-input",
            validate: function(el) {
                var field = el.parent().parent();
                var message = field.attr("data-tagsMessage");
                if (message) {
                    var taglist = field.parent().find("ul[data-init~=taglist] li");
                    var length = taglist.length;
                    if (length == 0) {
                        var message = field.attr("data-tagsMessage") + "";
                        return message;
                    }
                }
            }
        });

        // Register to listent custom event 'custom-tagpicker-tag-selected' 
        $("input.js-coral-pathbrowser-input").on('custom-tagpicker-tag-selected', function(event) {
            var el = $(this);
            el.checkValidity();
            el.updateErrorUI();
        });

    });


    //Below code triggers a custom event when a new tag is selected from tag browser so that field can       be revalidated
    $(document).on("foundation-contentloaded", function(event) {
        var rel = ".js-cq-TagsPickerField",
            rel2 = ".tagspicker";

        var $target = $(event.target);
        var $pathBrowser = $target.find(".js-cq-TagsPickerField.coral-PathBrowser");
        $pathBrowser.each(function() {
            var tagBrowser = $(this).data("pathBrowser");
            var $input = tagBrowser.inputElement;
            // Handle selections from the PathBrowser picker
            tagBrowser.$picker.on("coral-pathbrowser-picker-confirm.tagspicker", function(e) {
                $input.val("");
                $input.trigger('custom-tagpicker-tag-selected');
            });
            //Handle keypress event
            tagBrowser.inputElement.off("keypress" + rel2).on("keypress" + rel2, function(e) {
                var $pathBrowser = $(this).closest(rel + ".coral-PathBrowser");
                if (e.keyCode === 13) {
                    e.preventDefault();
                    $input.trigger('custom-tagpicker-tag-selected');
                }
            });

            // Handle type-in from the PathBrowser textfield
            tagBrowser.dropdownList.on("selected" + rel2, function(e) {
                var $pathBrowser = $(this).closest(rel + ".coral-PathBrowser");
                jQuery.get(e.selectedValue + ".tag.json", {},
                    function(data) {
                        if (data !== undefined) {
                            $input.trigger('custom-tagpicker-tag-selected');
                        }
                    },
                    "json");

            });

        });
    });
    //Register Tag Validator ENDS


})($, $(document));


Once you have added this JS to your page, you can call it in any number of fields. You just need to add the one property to the fields(as mentioned in Step 1 above) where you want tag validation.

AEM6 | Input Field validation

AEM6 uses Coral UI framework for touch UI rendering. So if you need to implement field validation, you should register a validator on that field supported by Coral UI. Refer the below example-

Sample code to implement mandatory validation on an Input field with trim function-

1. In your component field properties add two new properties- validation-trim (Set value to true) and trimMessage (Set value to the validation message). Look at the screenshot below-


2. Create a clientLibs Folder with category- "cq.authoring.dialog" and add a JS file having following code-

;(function ($, $document) {
    "use strict";
$document.on("dialog-ready", function() {
//Register Trimmed Value Validator
$.validator.register({
selector: "[data-validation-trim]",
validate: function(el) {
var length = el.val().trim().length;
if (length == 0) {
var message = el.attr("data-trimMessage");
return message;
}
}
});
});
})($, $(document));


Once you have added this JS to your page, you can call it in any number of fields. You just need to add two properties to the fields where you want validation as mentioned in Step 1 above.

CDN | Clearing Cloudflare cache

In order to clear Cloudflare cache automatically via code, follow below steps: 1. Develop Custom TransportHandler Develop a custom Trans...