Showing posts with label Dialogs. Show all posts

Sunday, June 19, 2016

Control component rendering in Touch UI Dialogs

RenderCondition comes very handy when you want to control rendering of your dialog. You can restrict display of field, button, tab etc. based on RenderConditions. I am going to take an  example of Carousel component where I will hide a tab panel from dialog to certain users. Consider the component dialog has two tabs- Carousel and List. Now to restrict display of one tab i.e. List to certain users who do not have "Create" access a certain path, perform following steps-

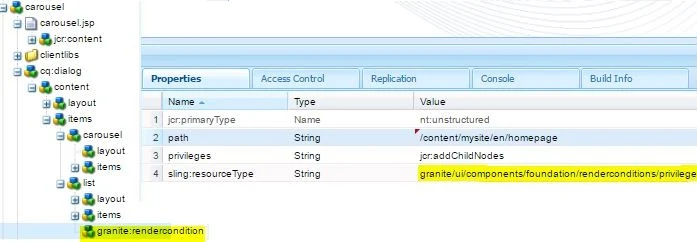
1. Go to cq:dialog component which you want to restrict for rendering, in this case go to - "/apps/myproject/components/carousel/cq:dialog/content/items/list" node

2. Create a new node "granite:rendercondition" of type "nt:unstructured"

3. Add following properties to this new node-
path- Type: String, Value: /content/mysite/en/homepage
privileges- Type: String, Value: jcr:addChildNodes
sling:resourceType-Type: String,Value: granite/ui/components/foundation/renderconditions/privilege

Another resourceType is - granite/ui/components/coral/foundation/renderconditions/simple which supports a expression property like this- 
expression="${param.item == '/content/mysite/en' || param.item == '/content/mysite/es'}" 
OR
expression="${granite:relativeParent(param.item, 1)== '/content/mysite'}" To ensure that just first level pages e.g. /content/mysite/en match the render condition.

Refer the screenshot below-

4. Save your changes. And go to useradmin console and revoke "Create" access on the following path- "/content/mysite/en/homepage". You can use regex also for the path value for pattern based matching as per your specific need.

5. Now go back to the page i.e. /content/mysite/en/homepage.html, Open the carousel component dialog, You should observe that the list tab does not appear to the logged in user as  the RenderCondition rule evaluates to false.

For more rendercondition options refer the link here-
https://developer.adobe.com/experience-manager/reference-materials/6-5/granite-ui/api/jcr_root/libs/granite/ui/docs/server/rendercondition.html

Wednesday, June 15, 2016

AEM6 | RTE validator plugin

You can use the belowJS for sample validator plugin for Rich text editor-

CUI.rte.plugins.ValidatorPlugin = new Class({

    toString: "ValidatorPlugin",

    extend: CUI.rte.plugins.Plugin,

    /**
     * RTE plugin for maximun length check. If maxlength is set to 0 the validation will not happen. Set a number 
     * greater than 0 for maxlength property.
     */

    /**
     * @private
     */
    alertShown: false,
    errorEl: null,

    /**
     * @private
     */
    _init: function(editorKernel) {
        this.inherited(arguments);
        editorKernel.addPluginListener("beforekeydown", this.handleKeyDown, this, this,
            false);
        editorKernel.addPluginListener("keyup", this.handleKeyUp, this, this,
            false);
        editorKernel.addPluginListener("paste", this.handlePaste, this, this.editContext,
            false);
    },
    handlePaste: function(e, ctx) {
        var k = e.nativeEvent;
        var newtext, existingText, isIE;
        var clp = (k.originalEvent || k).clipboardData;
        var ek = this.editorKernel;
        existingText = $(e.editContext.root).context.textContent;
        if (clp === undefined || clp === null) {
            newtext = window.clipboardData.getData('Text');
            isIE = true;
        } else {
            newtext = clp.getData('text/plain');
            isIE = false;
        }

        var fulltext = existingText + newtext;
        //console.log("hi");
        //console.log("Existing: " + existingText);
        console.log("value: " + fulltext);
        var len = fulltext.length;
        if (len > this.config.maxlength && this.config.maxlength != 0) {

            this.showError(ek, "Maximum character limit: '" + this.config.maxlength + "' reached!");
            $(e.editContext.root).context.textContent = fulltext.substr(0, this.config.maxlength);
            k.preventDefault();
        }
    },

    /**
     * Handles key strokes.
     * @param {Object} e The plugin event
     * @private
     */
    handleKeyDown: function(e, k) {
        //Don't handle delete, backspace and arrow clicks
        if (e.isBackSpace() || e.isDelete() || e.isShift() || e.ctrlKeyPressed ||
            (e.charCode > 32 && e.charCode < 41)) {
            return;
        }
        var context = e.editContext;
        var dpr = CUI.rte.DomProcessor;
        var sel = CUI.rte.Selection;
        var com = CUI.rte.Common;
        var lut = CUI.rte.ListUtils;
        var ek = this.editorKernel;
        /* if(e.charCode==13)
         {
             debugger;

         }*/
        if (!this.isValidMaxLength(e, context)) {
            this.showError(ek, "Maximum character limit: '" + this.config.maxlength + "' reached!");
            e.preventDefault();
            return;
        }
    },
    showError: function(ek, message) {
        if (!this.alertShown) {
            ek.getDialogManager().alert(
                CUI.rte.Utils.i18n("Error"),
                CUI.rte.Utils.i18n(message),
                CUI.rte.Utils.scope(this.focus, this));
            this.alertShown = true;
        } else {}

    },

    /**
     * Handles post-processing required for all browsers. The method is called whenever a
     * key has been pressed.
     * @param {Object} e The plugin event
     * @private
     */
    handleKeyUp: function(e) {},
    isValidMaxLength: function(e, context) {
        if (this.config.maxlength == 0) {
            return true;
        }

        var length = context.root.textContent.length;
        var $contentEditable = $('#ContentFrame').contents().find('[contenteditable="true"]').length ? $('#ContentFrame').contents().find('[contenteditable="true"] p>br') : $('[contenteditable="true"] p>br');
        length += $contentEditable.length;
        if (length >= this.config.maxlength) {
            return false;
        }
        return true;
    },
    notifyPluginConfig: function(pluginConfig) {
        pluginConfig = pluginConfig || {};
        CUI.rte.Utils.applyDefaults(pluginConfig, {
            "maxlength": 0,

        });
        this.config = pluginConfig;
    }

});


//register plugin
CUI.rte.plugins.PluginRegistry.register("customvalidate", CUI.rte.plugins.ValidatorPlugin);


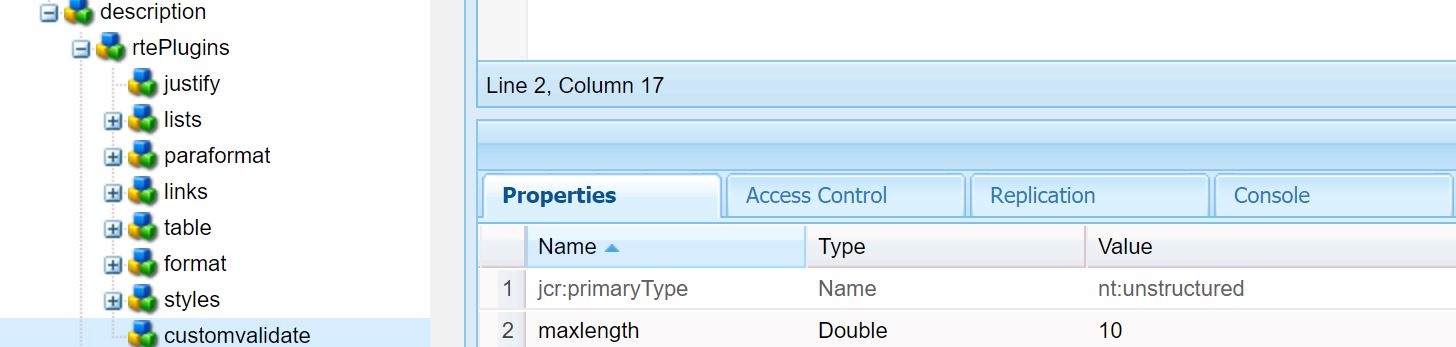
Put this js in a clientlibrary folder with category "cq.authoring.dialog".

After that in your component dialog, use the validator as shown below:


AEM6 | Tag field validation

As mentioned in previous post, AEM6 uses Coral UI framework for touch UI rendering. So if you need to implement field validation, you should register a validator on that field supported by Coral UI.

To implement validation on tag input field you can use the following sample code.


1. In your tagspicker input field add one property- tagsMessage (Set value to the validation message). Look at the screenshot below-


2. Create a clientLibs Folder with category- "cq.authoring.dialog" and add a JS file having following code-

;(function($, $document) {
    "use strict";
    $document.on("dialog-ready", function() {
        //Register Tag Field Validator
        $.validator.register({
            selector: "input.js-coral-pathbrowser-input",
            validate: function(el) {
                var field = el.parent().parent();
                var message = field.attr("data-tagsMessage");
                if (message) {
                    var taglist = field.parent().find("ul[data-init~=taglist] li");
                    var length = taglist.length;
                    if (length == 0) {
                        var message = field.attr("data-tagsMessage") + "";
                        return message;
                    }
                }
            }
        });

        // Register to listent custom event 'custom-tagpicker-tag-selected' 
        $("input.js-coral-pathbrowser-input").on('custom-tagpicker-tag-selected', function(event) {
            var el = $(this);
            el.checkValidity();
            el.updateErrorUI();
        });

    });


    //Below code triggers a custom event when a new tag is selected from tag browser so that field can       be revalidated
    $(document).on("foundation-contentloaded", function(event) {
        var rel = ".js-cq-TagsPickerField",
            rel2 = ".tagspicker";

        var $target = $(event.target);
        var $pathBrowser = $target.find(".js-cq-TagsPickerField.coral-PathBrowser");
        $pathBrowser.each(function() {
            var tagBrowser = $(this).data("pathBrowser");
            var $input = tagBrowser.inputElement;
            // Handle selections from the PathBrowser picker
            tagBrowser.$picker.on("coral-pathbrowser-picker-confirm.tagspicker", function(e) {
                $input.val("");
                $input.trigger('custom-tagpicker-tag-selected');
            });
            //Handle keypress event
            tagBrowser.inputElement.off("keypress" + rel2).on("keypress" + rel2, function(e) {
                var $pathBrowser = $(this).closest(rel + ".coral-PathBrowser");
                if (e.keyCode === 13) {
                    e.preventDefault();
                    $input.trigger('custom-tagpicker-tag-selected');
                }
            });

            // Handle type-in from the PathBrowser textfield
            tagBrowser.dropdownList.on("selected" + rel2, function(e) {
                var $pathBrowser = $(this).closest(rel + ".coral-PathBrowser");
                jQuery.get(e.selectedValue + ".tag.json", {},
                    function(data) {
                        if (data !== undefined) {
                            $input.trigger('custom-tagpicker-tag-selected');
                        }
                    },
                    "json");

            });

        });
    });
    //Register Tag Validator ENDS


})($, $(document));


Once you have added this JS to your page, you can call it in any number of fields. You just need to add the one property to the fields(as mentioned in Step 1 above) where you want tag validation.

AEM6 | Input Field validation

AEM6 uses Coral UI framework for touch UI rendering. So if you need to implement field validation, you should register a validator on that field supported by Coral UI. Refer the below example-

Sample code to implement mandatory validation on an Input field with trim function-

1. In your component field properties add two new properties- validation-trim (Set value to true) and trimMessage (Set value to the validation message). Look at the screenshot below-


2. Create a clientLibs Folder with category- "cq.authoring.dialog" and add a JS file having following code-

;(function ($, $document) {
    "use strict";
$document.on("dialog-ready", function() {
//Register Trimmed Value Validator
$.validator.register({
selector: "[data-validation-trim]",
validate: function(el) {
var length = el.val().trim().length;
if (length == 0) {
var message = el.attr("data-trimMessage");
return message;
}
}
});
});
})($, $(document));


Once you have added this JS to your page, you can call it in any number of fields. You just need to add two properties to the fields where you want validation as mentioned in Step 1 above.

CDN | Clearing Cloudflare cache

In order to clear Cloudflare cache automatically via code, follow below steps: 1. Develop Custom TransportHandler Develop a custom Trans...