Wednesday, November 6, 2024

Junit parallel execution Setup in pom.xml

 In maven based Java project, if your project has hundreds of Junit test cases it may take long time to run the application code build. To speed up build execution, it is recommended to setup your project to execute Junit Test in multi threaded parallel fashion. Below is sample code which you can put in your java module's pom.xml file:

<plugin>

<groupId>org.apache.maven.plugins</groupId>

<artifactId>maven-surefire-plugin</artifactId>

<configuration>

    <parallel>All</parallel>

    <forkCount>2C</forkCount>

    <reuseForks>true</reuseForks>

    <useSystemClassLoader>false</useSystemClassLoader>

</configuration>

</plugin>


Refer official documentation link for more details.

Tuesday, November 5, 2024

Version Issue with Custom AssetMetadataPermissionProvider implementation

While implementing custom metadata based permission provider, you can follow this article to implement it. One issue I faced during this implementation that the version access was not working. To fix this modify below methods:

@Override

public TreePermission getTreePermission(Tree tree, TreePermission parentPermission) {

if (PermissionHelpers.isDamPath(tree) || PermissionHelpers.isDamAncestorPath(tree)) {

if (PermissionHelpers.findAncestorAsset(tree) != null) {

return PermissionHelpers.isAncestorAssetOwner(tree, principalNames) ?

             TreePermission.ALL : parentPermission;

} else {

return new EmptyAssetMetadataTreePermission(tree, TreeType.DEFAULT, this);

}

} else if (tree.getPath().startsWith("/" + JcrConstants.JCR_SYSTEM)) {

      // This condition added to allow version to path access

      // This is just an example code, optimize this condition before you use

return TreePermission.ALL;

}

return TreePermission.NO_RECOURSE;

}

Another method:

@Override

public boolean isGranted(Tree tree, PropertyState property, long permissions) {

TreeType type = treeTypeProvider.getType(tree);

switch (type) {

case HIDDEN:

return true;

case VERSION:

Tree evalTree = getEvaluationTree(tree);

if (evalTree == null) {

return false;

}

if (evalTree.exists()) {

return internalIsGranted(evalTree, property, permissions);

} else {

return false;

}

case INTERNAL:

return false;

default:

return internalIsGranted(tree, property, permissions);

}

} 

Core logic to test metadata conditions to meet business requirement is put in the below private method which is called in the above isGranted method.

private boolean internalIsGranted(@NotNull Tree tree, @Nullable PropertyState property,

   long permissions) {

boolean answer = false;

if (PermissionHelpers.isAncestorAssetOwner(tree, principalNames)) {

answer = true;

}

if (property != null) {

LOG.debug("isGranted: {}@{} ({}) = {}", tree.getPath(), property.getName(),

             permissions, answer);

} else {

LOG.debug("isGranted: {} ({}) = {}", tree.getPath(), permissions, answer);

}

return answer;

}

PermissionHelpers here is a general utility class like below:


Junit Mocking Guide

 1. Mock private member of a class

Example to mock a private member "treeTypeProvider" of class CustomProvider.java

@InjectMocks
CustomProvider provider;

Field privateField = CustomProvider.class.getDeclaredField("treeTypeProvider");

privateField.setAccessible(true);

privateField.set(provider, treeTypeProvider);


2. Mock private method of a class

Ideally, you should avoid mocking a private method and coverage should be achieved through the public method that uses the particular private method. 

Example to mock a private method "getTypeProvider" of class CustomProvider.java

Class<?>[] params = new Class<?>[]{ParameterOne.class, ParameterTwo.class};

Field privateMethod = CustomProvider.class.getDeclaredMethod("getTypeProvider", params);

privateMethod.setAccessible(true);

privateMethod.invoke(provider, parameterOne, parameterTwo);


3. Mocking a Static class


Make sure you mock a Static class with a try-with-resources. Not doing so will affect Junit execution of other related classes using this Static class somewhere else in other Junit class.


try (MockedStatic<SampleUtils> utils = Mockito.mockStatic(SampleUtils.class)) {

utils.when(() -> SampleUtils.testMethod(node)).thenReturn(mockedNode);

......
......
 

}

4. Mocking object construction

Example to mock a construction statement like:

DocsProcessor processor = new DocsProcessor(); 

Mock it like below:

try (MockedConstruction< DocsProcessor > processor = Mockito.mockConstruction(DocsProcessor.class)) {

// Call any method that calls the DocsProcessor class constructor

......
......

        // Verify that constructor was called once 

        assertEquals(1, processor.constructed().size());

}

Thursday, April 27, 2023

AEMaaCS: Migration of Assets from Non-AEM sources | Using Bulk Import tool

 OOTB Bulk import tool facilitates a sophisticated content migration experience for non-AEM assets. This tool allows even non-tech users to import assets into AEM from cloud storage. To use this tool, you need all your source assets to be uploaded to a single cloud storage server i.e. Azure Blob Storage or Amazon S3, Google cloud storage etc. The process can be divided into 5 stages to simplify entire process:

1. AEM Pre-migration tasks- Like: Define/ Create base folder hierarchy, Define/ create taxonomy, Define/ Create Metadata Schema and apply those on migration folders.

2. Source Pre-migration tasks: Reorganize DAM hierarchy, Content cleanup, Delete unused/ test assets

3.  Upload assets to a cloud storage server i.e. Azure Blob Storage or Amazon S3. Bulk import tool ingests assets in AEM in the same structure that you put in cloud storage.

4. Configure and Run the Bulk Import

5. Prepare for the metadata import (Assuming that the assets ingested in step 3 did not contain necessary metadata added) and run metadata import in AEM

In order to configure Bulk Import which is an option available on AEMaaCS cloud servers (not available in local SDK) follow below:

a. Go to Tools -> Assets -> Bulk Import -> Create

b. Fill in necessary information to your cloud storage like- bucket id, access key, secret key/ token etc.


 c. Save the settings and click on "check" to test the connection. 


With this you set be all set to run the asset ingestion into AEM. You can even schedule it to tun at specific time as per business need. While configuring the import tool, you can also, configure how to handle existing assets in same location:


Refer this link for more information on this- https://experienceleague.adobe.com/docs/experience-manager-learn/cloud-service/migration/bulk-import.html

Monday, April 10, 2023

Enable SMTP host and port in AEM Cloud Service

AEM Cloud Service blocks communication to any external host and port by default. As SMTP run on external servers, it need to be allow listed.  Sample SMTP email configuration:

{
"smtp.host": "$[env:AEM_PROXY_HOST;default=proxy.tunnel]",
"smtp.port": 30587,
"smtp.user": "$[env:EMAIL_USERNAME]",
"smtp.password": "$[secret:EMAIL_PASSWORD]",
"from.address": "xxxx@xxxx.com",
"smtp.ssl": false,
"smtp.starttls": true,
"smtp.requiretls":true
}

This article just talks about setting up host and port of SMTP configuration, rest configuration should be done using OSGi configuration file and environment variables.

SMTP User Name and Password should be stored as environment variables as shown below:

SMTP host and port is set using advance networking option which is explained in this article below. Necessary configurations are done through the Advance Networking Options to your cloud service program. Follow below steps to do that: 

Step 1- Create a new project in Adobe I/O - . Inside that add an API integration -> select type as Cloud Manager. 

Step 2- Open the integration and click on Edit Product Profiles. Select appropriate access like below:

Step 3- In left menu, click on "Service Account (JWT). On this screen generate a public private key pair. Download the certificate details.

Step 4- Using this private key, "generate access token" as shown in Step 2.

Step 5- Use this access token to configure Advance Networking Options to your cloud service program and environments.

Step 6- You can use Postman to enable these network settings. The actions are in below sequence:
a. Figure out your server's primary region. Go to Cloud Manager -> Environment Details. This is needed to create primary network. Get region id from this API - API Link.

GET https://cloudmanager.adobe.io/api/program/{program-id}/regions


e.g. region id might be "va7" for East US.

b. Next thing check if Primary Network has been created or not. 

GET https://cloudmanager.adobe.io/api/program/{program-id}/networkInfrastructures

If network infrastructure has been created, you will see response like below:


c. If you don't see primary region network infrastructure in previous step then go ahead and create a new one using this - Create network infrastructure. 

POST https://cloudmanager.adobe.io/api/program/{program-id}/networkInfrastructures

Your post body should follow below format:

{
"kind": "flexiblePortEgress",
"region": "va7", #Set to value found in step 6#a
"isPrimaryRegion": true
} 

d. First check if advanced networking exists or not for your particular environment using this API.

GET https://cloudmanager.adobe.io/api/program/{program-id}/environment/{environment-id}/advancedNetworking
e. If networkingConfigurations is not configured or you do not see portForwards details in previous step d, then create a networkingConfiguration using Enable Environment Advanced Networking Configuration API.

PUT https://cloudmanager.adobe.io/api/program/{program-id}/environment/{environment-id}/advancedNetworking

Your post body should be in below format. Change smtp host and port values under portForwards as per your SMTP details. Sample Format:
{
"nonProxyHosts": [
"*.my-website.com"
],
"portForwards": [
{
"name": "your-smtp-server.com",
"portDest": 587,
"portOrig": 30587
}
]
}
That's it! Now you can test email functionality in your AEM application. Also, check logs for any further
debugging.

Saturday, January 7, 2023

Asset Insights with Adobe Analytics

What is Asset Insights?

Asset Insights feature in AEM is an armour to the modern day marketers which enables them to keep an eye on asset’s effectiveness and impact on their business across the IOT. It helps to track down usage statistics of the images that are used in third-party websites, Social channels, marketing campaigns, and Adobe’s creative solutions including AEM sites.


Adobe Analytics is an integral part of this solution, so the license has to be purchased separately if customer does not have an existing account. AEM is then integrated with Adobe Analytics which captures user activity details on the assets, such as the number of times an image is rated, clicked, and impressions (number of times an image is loaded on the website). Then, based on these statistics AEM assigns scores to images. The scores and performance statistics are used to select popular images for inclusion in catalogs, marketing campaigns, and so on. We can even formulate archival and license renewal policies based on these statistics.

Architecture

The following diagram illustrates the solution design using Adobe Launch:


Implementation

3 products i.e. Analytics, Launch and AEM has to configured along with installation of core components. Skip the piece which is already present in the existing implementation.

Analytics

Launch

  1. Login to Launch : https://activation.adobe.com
  2. Create new web property
  3. Enable Adobe Analytics extension and attach the report suite created
  4. Go to Rules – Create New Rule
        Events – Library Loaded
        Actions- Custom Code – HTML 
        <script type="text/javascript" src="http://localhost:4503/etc.clientlibs/dam/clientlibs/assetinsights/pagetracker.js"></script>
  5. Add one more rule:
       Events- Dom Ready
       Actions- Custom Code – Java script
       Add tracker javascript-  dom-ready-tracker.js
       Add one more action - image-click.js
  6. Publish all changes
  7. Integrate Launch with AEM- https://console.adobe.io/home
  8. Create Integration -> Access an API -> Experience Platform Launch API
  9. Follow article here for all steps- https://docs.adobe.com/content/help/en/experience-manager-learn/assets/analytics/asset-insights-launch-tutorial-setup.html

AEM

  1. Go to Tools -> Assets -> Insights Configuration

    Username/ Shared secret is found at Analytics > Admin > Company Settings > Web Services
  2. Check Embed options
  3. Go to Tools -> Cloud Services -> Legacy -> Analytics -> performance
  4. If Asset Id not created- Use JMX Mbean to fix it: http://localhost:4502/system/console/jmx/com.day.cq.dam%3Atype%3DAssociate+Asset+IDs
  5. Launch (or DTM) Integration: Tools -> Cloud Services -> Adobe Launch Configurations

      Validate Header and Footer code that of Embed from Launch - it should be same.

  6. Go to /content/we-retail.html -> page properties and setup cloud services to use Launch
  7. Install latest Core components- https://github.com/adobe/aem-core-wcm-components/releases 
  8. Install sample image component supporting insights tracking:
    https://docs.adobe.com/content/help/en/experience-manager-learn/assets/analytics/assets/aem-assets-insights-sample.zip 
  9. Use sample component on an AEM page to enable asset tracking.
Once the 3 products are configured, AEM sites will start sending analytics data to Adobe Analytics and "Get Embed Code" button enabled in Assets admin UI.

Data from Adobe Analytics server is synced with AEM by default. If we want to change the schedule, it can be done from this OSGi configuration:

Wednesday, July 20, 2022

Jenkins/ Git/ CVS : Syncing / Pushing a branch from one repo to another repo

 If you want to sync or push a branch from one repo to another on certain git events like merge or push, Jenkin provides a "Git Publisher" step which you can utilize to sync or push your branch code to another repo. Steps are given below:


1. Create a new job in Jenkins

2. Configure "Source Code Management". Configure 2 repos : one for source repo and other for target repo. In my case- Source repo name is - "adobe-git" and Target repo name is - "ams-git"

For each repo define 3 things:

a. Repository URL- Depending on credentials type, you have two options: either enter ssh URL or https URL. For simplicity - I recommend using https URL format of your repo like this- https://myrepo.github.com/myorg/myreponame/

b. Credentials: Select the Add option provided to save repo credentials so that Jenkin can authenticate the repo to perform sync operation. Here you will see multiple option. For simplicity - I recommend using "Username with Password" option. If 2 factor auth is enabled for your git account- Create a Personal Access Token in git account and use that as a password. In password field use your Personal Access Token.

c. Git your each repo a custom name e.g. adobe-git. You can use this name in rest of configuration to point your specific repo.


3. Optionally, you can also setup branches to build if you want to push happen only when source branch build is successful to avoid any breaking build to have been pushed to target repo. In this option set the value in this format: {source repo name}/{source branch name}


4.  Configure "Build Triggers". If you want Jenkin to automatically poll to source repo and push any new commits to target repo, you can configure "Poll SCM" with some schedular cron e.g. H/10 * * * *

This cron expression means job will automatically run every 10 mins. If there is any change (if new PRs were merged in the source branch) in source repo, it will push to target repo.


5. Configure "Build Environment". Enable "Delete workspace before build starts" option.

6. Optionally, Configure "Build". 


7. Configure "Post Steps". Enable "Run only if build succeeds".

8. Configure "Post-build Actions". Add a "Git Publisher" step and configure it to point to target repo and target branch.

In case the target branch does not exist configure the "Branch to push" in this format- "refs/heads/develop".

That's all. Save the Job and test it.


Friday, July 8, 2022

Sonarqube on Docker with AEM plugin

 1. Install docker

2. Install Sonarqube Image with this command- 

    docker pull sonarqube

     https://hub.docker.com/_/sonarqube

3. Once docker image is ready, Run it with following settings:


Make sure to enter Ports value like: 9000

4. Once server is up and running, Open the Sonar server in your browser

http://localhost:9000

5. Go to administration -> Marketplace and enable AEM Rules


6. Run the sonar build on project

mvn sonar:sonar -Dsonar.login=admin -Dsonar.password=admin

Tuesday, July 5, 2022

Introducing AEM Guides (CCMS / XML Documentation)

 Guide link- https://helpx.adobe.com/support/xml-documentation-for-experience-manager.html 

AEM Guides come up with two versions:

UUID version: 

This is recommended to use and all new implementations should use this version preferably.

Non-UUID version: 

This version is for existing CCMS implementations where existing documents does not have UUID generated. 


Steps: Install and configure https://helpx.adobe.com/content/dam/help/en/xml-documentation-solution/4-1/Adobe-Experience-Manager-Guides_Installation-Configuration-Guide_EN.pdf 

Saturday, April 9, 2022

Sonarqube Setup with Jenkin

Objective- Deploy code build to Snarqube via Jenkins using Sonar-scanner plugin

 1. Add jacoco plugin to your core project pom.xml so that Junit coverage report can be analysed by Sonarqube. The snippet is given at the bottom. in this article.

2. Go to Sonarqube -> Projects -> New Project -> Enter Project Name -> Generate a login token 


3. Go to Jenkins -> Create a new Job
    a. Fill Source Code Management section
    b. Set Branches to build like */develop
   c. Set Build Triggers as "Poll SCM" with following schedule (Check for git change every 15 mins) 
       H/15 * * * *
   d. Check 
?
  f. In Build section, enter "pom.xml" and set goal as "clean install"


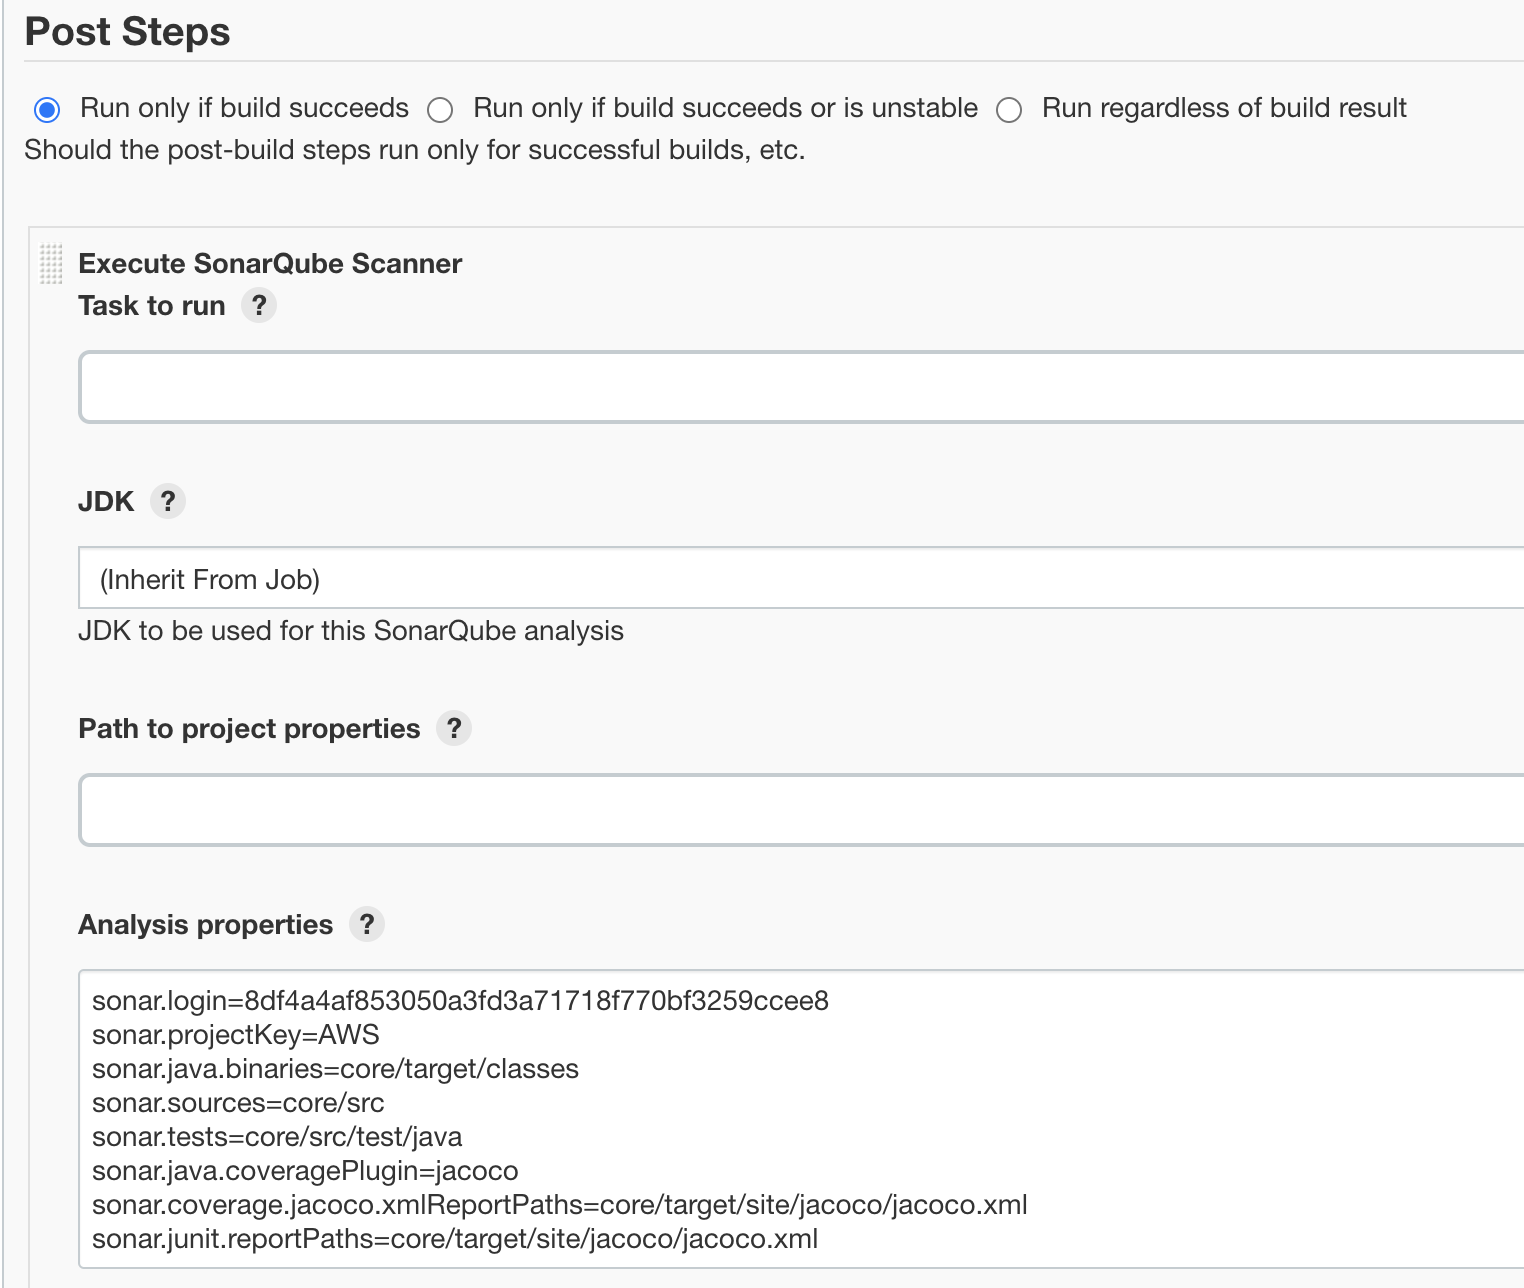
  g. In post step, Set 


 h. In "Add Post Build Step" dropdown select "Execute SonarQube Scnanner" option
 i. In the analysis property set as following:

sonar.login=yourlogin-token-from-step2-above
sonar.projectKey=your-project-name-from-step-2-above
sonar.java.binaries=core/target/classes
sonar.sources=core/src
sonar.tests=core/src/test/java
sonar.java.coveragePlugin=jacoco
sonar.coverage.jacoco.xmlReportPaths=core/target/site/jacoco/jacoco.xml
sonar.junit.reportPaths=core/target/site/jacoco/jacoco.xml


4. Once setup trigger the Jenkin job. Once build is successful, the code analysis will be sent to Sonarqube. Go to Sonarqube and check if a new project appears on your dashboard.


Thursday, June 3, 2021

AEM Cloud Service | Set up Adobe I/O CLI for log tailing

Perquisites- Node.js >=10.22.0 must be installed in system. Check this by executing below command:

node --version

Upgrade to higher node version if needed, using below command:

nvm install 12.18.3

Run following commands:

  1. npm install -g @adobe/aio-cli
  2. aio plugins:install @adobe/aio-cli-plugin-cloudmanager
  3. aio plugins:install @adobe/aio-cli-plugin-asset-compute

Set up the Adobe I/O CLI authentication

  1. Log in to console.adobe.io
  2. Ensure your Organization that includes the Cloud Manager product to connect to is active in the Adobe Org switcher
  3. Create a new or open an existing Adobe I/O program
    • Adobe I/O Console programs are simply organizational groupings of integrations, create or use and existing program based on how you want to manage your integrations
    • If creating a new project, select “Empty Project” if prompted (vs. “Create from Template”)
    • Adobe I/O Console programs are different concepts to Cloud Manager programs
  4. Create a new Cloud Manager API integration with the “Developer - Cloud Service” profile
  5. Obtain the Service Account (JWT) credentials needs to populate Adobe I/O CLI’s config.json
  6. Load the config.json file into the Adobe I/O CLI
    • $ aio config:set ims.contexts.aio-cli-plugin-cloudmanager PATH_TO_CONFIG_JSON_FILE --file --json
  7. Load the private.key file into the Adobe I/O CLI
    • $ aio config:set ims.contexts.aio-cli-plugin-cloudmanager.private_key PATH_TO_PRIVATE_KEY_FILE --file

Once setup is done use below command(s) to tail logs-

  • aio cloudmanager:environment:tail-log ENVIRONMENTID SERVICE NAME 
    ARGUMENTS 
     ENVIRONMENTID the environment id 
     SERVICE the service 
     NAME the log name
  • aio cloudmanager:execution:tail-step-log PIPELINEID ACTION 
     ARGUMENTS 
     PIPELINEID the pipeline id 
     ACTION (build) [default: build] the step action

Monday, November 16, 2020

Windows | Disk cleanup and Improve performance

 1. Press window button -> Type "run" and hit Enter button -> Search for "%temp%


Delete all temporary files.

2. Press window button -> Type "storage" and hit Enter button 


Click on individual drives to see memory consumption details. Like below:


This way you can figure out where large amount of space is consumed and do necessary cleanup.

Friday, August 14, 2020

Useful Tips for Excel

Here are some commonly used Excel formulas, you may run into need:

  1. Extract a portion of String - Left side of a match pattern
    Formula: =LEFT(A1,SEARCH("MyTest",A1)-1)
    A1 - the cell on which value to run this formula; It can be replaced with String value as needed
    MyTest- the search term
    Input: This is very tricky MyTest shows it rightly!
    Output: This is very tricky

  2. Extract a portion of String - Right side of a match pattern
    Formula: =RIGHT(A1,LEN(A1)-SEARCH("MySecondTest",A1)-LEN("MySecondTest"))
    A1 - the cell on which value to run this formula; It can be replaced with String value as needed
    MySecondTest- the search term
    Input: This is very tricky MySecondTest shows it rightly!
    Output: shows it rightly!

  3. Storage Conversion- Convert all types to Byte
    Formula: =IF(TRIM(RIGHT(A1,2))="B",LEFT(A1,LEN(A1)-2),LEFT(A1,LEN(A1)-2)*(1024)^MATCH(RIGHT(TRIM(A1),2),{"KB","MB","GB"},0))
    A1 - the cell on which value to run this formula; It can be replaced with String value as needed

    Input: 1.1 GB
    Output: 1181116006

  4. Storage Conversion- Convert Byte to Relevant size
    Formula: =TEXT((A1/(1024^INT(LOG(A1,1024)))),"0.000")&CHOOSE(INT(LOG(A1,1024))," KB"," MB"," GB")
    A1 - the cell on which value to run this formula; It can be replaced with String value as needed

    Input: 1181116006
    Output: 1.1 GB


Friday, June 26, 2020

AEM as a Cloud Service | Fact Sheet for Beginners

Adobe released AEM as a Cloud Service which is the cloud-native way of leveraging the AEM applications. It's very powerful but has some limitations too in comparison to conventional AEM product which is again for the better reasons. In this article, I am going to present a fact sheet which can act as a short hand guide to understand various capabilities and limitations of AEMaaCS.


Top Features:

  1. Inbuilt CI/CD- Provides Continuous Delivery and Continuous Integration for updates with zero downtime. The build pipelines comes with code quality check, performance testing and security checks ( via automated tests to scan for common vulnerabilities). Code quality check is done through a combination of SonarQube and content package-level examination using OakPAL.
  2. Zero Downtime- Follows green - blue deployment model so your application never goes down even while deploying code or going through maintenance tasks.
  3.  Inbuilt CDN- It has built-in Content Delivery Network (CDN).
  4. Auto-scaling- It is based on a dynamic architecture that autoscales (up and down both) the infrastructure vertically a well as horizontally based on site load.
  5. Always Optimized- Performance topologies optimized for maximum resilience and efficiency. No need to run compaction and maintenance on server as it trashes itself once in a day and replaced by newer and healthy nodes.
  6. Always current and evolving- Comes with automated updates up to several times a month.  By keeping you always on the most recent version, it solves a critical challenge of AEM applications: Eliminating need to worry about upgrade to next AEM Version. Evolves on a daily basis, based on the projects implemented by customers. Content, code and configurations are constantly reviewed and vetted against best practices.

Development Guidelines

Code running in AEMaaCS must be aware of the fact that it is always running in a cluster. This means that there is always more than one instance running. The code must be resilient especially as an instance might be stopped at any point in time. During the update of AEMaaCS, there will be instances with old and new code running in parallel. Therefore, old code must not break with content created by new code and new code must be able to deal with old content.
  1. State in Memory- State must not be kept in memory but persisted in the repository.
  2. State on the Filesystem- The instance's file system should not be used in AEMaaCS. The disk is ephemeral and will be disposed when instances are recycled. Publish tier should ensure that any data that needs to be persisted is shipped off to an external service for longer term storage.
  3. Observation- With everything that is asynchronously happening like acting on observation events, it cannot be guaranteed to be executed locally and therefore must be used with care. This is true for both JCR events and Sling resource events. At the time a change is happening, the instance may be taken down and be replaced by a different instance.
  4. Background Tasks and Long Running Jobs- Code executed as a background tasks must assume that the instance it is running in can be brought down at any time. So the code must be resilient and most importantly resumable. That means that if the code gets re-executed it should not start from the beginning again but rather close to from where it left off.
    - To minimize the trouble, long running jobs should be avoided if possible, and they should be resumable at a minimum.
    - For executing such jobs, use Sling Jobs, which have an at-least-once guarantee and hence if they get interrupted will get re-executed as soon as possible.
    - For scheduling such jobs, it is best to use the Sling Jobs scheduler as this again the at-least-once execution.
    - The Sling Commons Scheduler should not be used for scheduling as execution cannot be guaranteed.
  5. Outgoing HTTP Connections - It is strongly recommended that any outgoing HTTP connections set reasonable connect and read timeouts. For code that does not apply these timeouts, AEMaaCS will enforce a global timeouts. These timeout values are 10 seconds for connect calls and 60 seconds for read calls. Use the OOTB provided Apache HttpComponents Client 4.x library for making HTTP connections.
  6. No Classic UI Customizations- AEMaaCS only supports the Touch UI for 3rd party customer code. Classic UI is not available for customization. 
  7. Avoid Native Binaries- Code will not be able to download binaries at runtime nor modify them. For example, it will not be able to unpack jar or tar files. 
  8. No Streaming Binaries- Binaries should be accessed through the CDN, which will serve binaries outside of the core AEM services. For example, do not use asset.getOriginal().getStream() , which triggers downloading a binary onto the AEM service's ephemeral disk. 
  9. No Reverse Replication Agents- Reverse replication from Publish to Author is not supported in AEM as a Cloud Service. Instead, use an external persistence store that is shared amongst the farm of Publish instances and potentially the Author cluster. 
  10. Forward Replication Agents Need to be Ported- Content is replicated from Author to Publish through a pub-sub mechanism. Custom replication agents are not supported. 
  11. Logs- On Cloud environments, developers can download logs through Cloud Manager or use a command line tool to tail the logs. 
  12. CRX/DE Lite and System Console-
    - For local development, Developers have full access to CRXDE Lite ( /crx/de ) and the AEM Web Console ( /system/console ).
    - Note that on local development (using the cloud-ready quickstart), /apps and /libs can be written to directly, which is different from Cloud environments where those top level folders are immutable.
    - For AEMaaCS customers can access CRXDE lite on the development environment but not stage or production.
    - A set of tools for debugging developer environments are available in the Developer Console for dev, stage, and production environments. The url can be determined by adjusting the Author or Publish service urls as follows: https://dev-console/-<namespace>.<cluster>.dev.adobeaemcloud.com
    - As a shortcut, the following Cloud Manager CLI command can be used to launch the developer console based on an environment parameter described below:
    aio cloudmanager:open-developer-console <environmentid> --programId <programid>
  13. OSGi Configuration Files - Configuration changes are placed in code packages(ui.apps) with .cfg.json extension under runmode specific config folders: /apps/example/config..
    - Runmode Resolution is supported by specific OSGi configurations in the following format: Create config folders under /apps/example (where example is your project name), in the format: /apps/example/config.<author|publish>.<dev|stage|prod>/. No other custom run modes are supported.
    - The format of OSGi configuration files are JSON-based format defined by the Apache Sling project. OSGi configurations target OSGi components via their Persistent Idenity (PID), which defaults to the OSGi component's Java class name. For example, for this class: "com.example.workflow.impl.ApprovalWorkflow.java" an OSGi configuration file is defined at: "/apps/example/config/com.example.workflow.impl.ApprovalWorkflow.cfg.json".
  14. OSGi Installer Configuration Printer - Use this tool to generate OSGi configuration file in .cfg.json format. This tool can be found in AEM SDK Quickstart Jar's AEM Web console. Go to OSGi > OSGi Installer Configuration Printer
    There are 3 type of OSGi configuration values - inline, environment specific and secret values.
    Sample configuration:
    {
    "connection.timeout": 1000,
    "api-key": "$[secret:server-api-key;default=<value>]",
    "url": "$[env:server-url]"
    }
  15. Setting OSGi Values via API- Calling the API will deploy the new variables and values to a Cloud environment, similar to a typical customer code deployment pipeline. Up to 20 variables can be declared. The author and publish services will be restarted and reference the new values, typically taking a few minutes. Format:
    PATCH /program/{programId}/environment/{environmentId}/variables
    Via command line -
    $ aio cloudmanager:set-environment-variables ENVIRONMENT_ID --variable MY_VAR1 "plaintext value" --secret MY_VAR2 "some secret value"
    Refer this link for more details - Cloud Manager API

Key Concepts

  1. AEM as a Cloud Service SDK- It is recommended to refresh local SDK in stance at least after a monthly maintenance release. The SDK is comprised of the following artifacts:
    - Quickstart Jar - The AEM runtime used for local development
    - Java API Jar - Formerly called Uberjar. The Java Jar/Maven Dependency that exposes all allowed Java APIs used to develop against AEM as as Cloud Service.
    - Javadoc Jar - The javadocs for the Java API Jar
    - Dispatcher Tools - The set of tools used to develop against Dispatcher locally. Separate artifacts for unix and windows.
  2. Immutable Areas: Can not be changed at runtime- /apps, /libs. Any attempt to change an immutable area at runtime will fail. 
  3. Mutable Areas: Can be changed at runtime - /content , /conf , /var , /etc , /oak:index , /system , /tmp , etc.
  4. /oak:index deployed part of ui.apps- oak:index configurations are part of the Code Package even though they are mutable because they need to be deployed before any other mutable content.
  5. Separation of content and code- Which means a single content package cannot deploy to both /apps and runtime-writable areas (e.g. /content , /conf , /home , or anything not /apps ) of the repository. Instead, the application must separate code and content into discrete packages for deployment into AEM - ui.apps and ui.content.
  6. Repo Init (Repoinit)- Repo Init provides instructions, or scripts, that define JCR structures, ranging from common node structures like folder trees, to users, service user, groups and ACL definition. They are deployed part of ui.apps. Repo Init scripts are stored as scripts entries of RepositoryInitializer OSGi factory configurations.
  7. Package Types- Packages are to be marked with their declared package type.
     - Container packages must not have a packageType
     - Code (immutable) packages must set packageType to application
     - Content (mutable) packages must set packageType to content
  8. Repository Structure Package- Code Packages e.g. ui.apps require configuring the FileVault Maven plug-in's configuration to reference a <repositoryStructurePackage> that enforces correctness of structural dependencies (to ensure one code package doesn't install over another). This is only required for Code packages i.e. Package marked with <packageType>application</packageType>.
  9. Embed Packages- All Container package embeds the following packages, to create a singular deployment artifact
    -ui.apps embedded in /apps/my-app-packages/application/install deploys code to both AEM author and AEM publish
    -ui.apps.author embedded in /apps/my-app-packages/application/install.author deploys code to only AEM author
    -ui.content embedded in /apps/my-app-packages/content/install deploys content and configuration to both AEM author and AEM publish
    -ui.content.publish embedded in /apps/my-app-packages/content/install.publish deploys content and configuration to only AEM publish
  10. Embedding 3rd-party Packages- All packages must be available via the Adobe's public Maven artifact repository or an accessible public, referenceable 3rd party Maven artifact repository.
    -If the 3rd party packages are in Adobe's public Maven artifact repository , no further configuration is needed for Adobe Cloud Manager to resolve the artifacts.
    -If the 3rd party packages are in a public 3rd party Maven artifact repository , this repository must be registered in the project's pom.xml and embedded thereafter.
  11. Package organization:

Constraints

  1. i18n dictionary translation - Does not work at runtime as 
  2. Developer Mode in AEM Sites Page Editor
  3. Code is never deployed directly to a running AEM instance - It means no code package deployment via crx package manager, no direct changes via OSGi Console etc. All content and code persisted in the immutable repository must be checked into git and deployed through Cloud Manager. 
  4. Package Manager can not install content or code into the immutable repository, so these content packages should only consist of mutable content (mainly /content or /conf ). 
  5. Use AEM Project Maven Archetype 21 or later
  6. Packages are now included using the Maven FileVault Package Maven plugin's embeddeds configuration , rather than the <subPackages> configuration.
  7. Any content-packages installed via Cloud Manager (both mutable and immutable) will appear in frozen state in crx Package Manager. These packages cannot be reinstalled, rebuilt or even downloaded, and will be listed with a "cp2fm" suffix, indicating their installation was managed by Cloud Manager.
  8. It is not supported to configure custom domain names for the AEM author tier.
  9. Securing the Author Tier- By default the author tier is accessible from the Internet by default. To secure it- the procedure is based on authorizing the IP ranges that should be granted network access to your author environment. Raise a Support ticket from the Adobe Admin Console with the requested information: program ID, environment ID and, IP address ranges to authorize

Deprecated/ Removed Features

  1. The DAM Asset Update workflow has been deprecated as it is no longer needed and replaced by robust asset processing service called Asset Microservices.
  2. Use of certain softwares e.g. ImageMagick and FFmpeg has been made obsolete. These should be handled via processing profiles.
  3. Except to some admin tools, the Classic UI in general has been removed in the AEM product UI.
  4. Dynamic Media Classic (Scene7) and Dynamic Media Hybrid mode are not available in AEM as a Cloud Service. Just use Dynamic Media.
  5. Portal Director, Portlet Component and Design Importer features has been removed.

CDN | Clearing Cloudflare cache

In order to clear Cloudflare cache automatically via code, follow below steps: 1. Develop Custom TransportHandler Develop a custom Trans...