Saturday, January 7, 2023

Asset Insights with Adobe Analytics

What is Asset Insights?

Asset Insights feature in AEM is an armour to the modern day marketers which enables them to keep an eye on asset’s effectiveness and impact on their business across the IOT. It helps to track down usage statistics of the images that are used in third-party websites, Social channels, marketing campaigns, and Adobe’s creative solutions including AEM sites.


Adobe Analytics is an integral part of this solution, so the license has to be purchased separately if customer does not have an existing account. AEM is then integrated with Adobe Analytics which captures user activity details on the assets, such as the number of times an image is rated, clicked, and impressions (number of times an image is loaded on the website). Then, based on these statistics AEM assigns scores to images. The scores and performance statistics are used to select popular images for inclusion in catalogs, marketing campaigns, and so on. We can even formulate archival and license renewal policies based on these statistics.

Architecture

The following diagram illustrates the solution design using Adobe Launch:


Implementation

3 products i.e. Analytics, Launch and AEM has to configured along with installation of core components. Skip the piece which is already present in the existing implementation.

Analytics

Launch

  1. Login to Launch : https://activation.adobe.com
  2. Create new web property
  3. Enable Adobe Analytics extension and attach the report suite created
  4. Go to Rules – Create New Rule
        Events – Library Loaded
        Actions- Custom Code – HTML 
        <script type="text/javascript" src="http://localhost:4503/etc.clientlibs/dam/clientlibs/assetinsights/pagetracker.js"></script>
  5. Add one more rule:
       Events- Dom Ready
       Actions- Custom Code – Java script
       Add tracker javascript-  dom-ready-tracker.js
       Add one more action - image-click.js
  6. Publish all changes
  7. Integrate Launch with AEM- https://console.adobe.io/home
  8. Create Integration -> Access an API -> Experience Platform Launch API
  9. Follow article here for all steps- https://docs.adobe.com/content/help/en/experience-manager-learn/assets/analytics/asset-insights-launch-tutorial-setup.html

AEM

  1. Go to Tools -> Assets -> Insights Configuration

    Username/ Shared secret is found at Analytics > Admin > Company Settings > Web Services
  2. Check Embed options
  3. Go to Tools -> Cloud Services -> Legacy -> Analytics -> performance
  4. If Asset Id not created- Use JMX Mbean to fix it: http://localhost:4502/system/console/jmx/com.day.cq.dam%3Atype%3DAssociate+Asset+IDs
  5. Launch (or DTM) Integration: Tools -> Cloud Services -> Adobe Launch Configurations

      Validate Header and Footer code that of Embed from Launch - it should be same.

  6. Go to /content/we-retail.html -> page properties and setup cloud services to use Launch
  7. Install latest Core components- https://github.com/adobe/aem-core-wcm-components/releases 
  8. Install sample image component supporting insights tracking:
    https://docs.adobe.com/content/help/en/experience-manager-learn/assets/analytics/assets/aem-assets-insights-sample.zip 
  9. Use sample component on an AEM page to enable asset tracking.
Once the 3 products are configured, AEM sites will start sending analytics data to Adobe Analytics and "Get Embed Code" button enabled in Assets admin UI.

Data from Adobe Analytics server is synced with AEM by default. If we want to change the schedule, it can be done from this OSGi configuration:

Wednesday, July 20, 2022

Jenkins/ Git/ CVS : Syncing / Pushing a branch from one repo to another repo

 If you want to sync or push a branch from one repo to another on certain git events like merge or push, Jenkin provides a "Git Publisher" step which you can utilize to sync or push your branch code to another repo. Steps are given below:


1. Create a new job in Jenkins

2. Configure "Source Code Management". Configure 2 repos : one for source repo and other for target repo. In my case- Source repo name is - "adobe-git" and Target repo name is - "ams-git"

For each repo define 3 things:

a. Repository URL- Depending on credentials type, you have two options: either enter ssh URL or https URL. For simplicity - I recommend using https URL format of your repo like this- https://myrepo.github.com/myorg/myreponame/

b. Credentials: Select the Add option provided to save repo credentials so that Jenkin can authenticate the repo to perform sync operation. Here you will see multiple option. For simplicity - I recommend using "Username with Password" option. If 2 factor auth is enabled for your git account- Create a Personal Access Token in git account and use that as a password. In password field use your Personal Access Token.

c. Git your each repo a custom name e.g. adobe-git. You can use this name in rest of configuration to point your specific repo.


3. Optionally, you can also setup branches to build if you want to push happen only when source branch build is successful to avoid any breaking build to have been pushed to target repo. In this option set the value in this format: {source repo name}/{source branch name}


4.  Configure "Build Triggers". If you want Jenkin to automatically poll to source repo and push any new commits to target repo, you can configure "Poll SCM" with some schedular cron e.g. H/10 * * * *

This cron expression means job will automatically run every 10 mins. If there is any change (if new PRs were merged in the source branch) in source repo, it will push to target repo.


5. Configure "Build Environment". Enable "Delete workspace before build starts" option.

6. Optionally, Configure "Build". 


7. Configure "Post Steps". Enable "Run only if build succeeds".

8. Configure "Post-build Actions". Add a "Git Publisher" step and configure it to point to target repo and target branch.

In case the target branch does not exist configure the "Branch to push" in this format- "refs/heads/develop".

That's all. Save the Job and test it.


Friday, July 8, 2022

Sonarqube on Docker with AEM plugin

 1. Install docker

2. Install Sonarqube Image with this command- 

    docker pull sonarqube

     https://hub.docker.com/_/sonarqube

3. Once docker image is ready, Run it with following settings:


Make sure to enter Ports value like: 9000

4. Once server is up and running, Open the Sonar server in your browser

http://localhost:9000

5. Go to administration -> Marketplace and enable AEM Rules


6. Run the sonar build on project

mvn sonar:sonar -Dsonar.login=admin -Dsonar.password=admin

Tuesday, July 5, 2022

Introducing AEM Guides (CCMS / XML Documentation)

 Guide link- https://helpx.adobe.com/support/xml-documentation-for-experience-manager.html 

AEM Guides come up with two versions:

UUID version: 

This is recommended to use and all new implementations should use this version preferably.

Non-UUID version: 

This version is for existing CCMS implementations where existing documents does not have UUID generated. 


Steps: Install and configure https://helpx.adobe.com/content/dam/help/en/xml-documentation-solution/4-1/Adobe-Experience-Manager-Guides_Installation-Configuration-Guide_EN.pdf 

Saturday, April 9, 2022

Sonarqube Setup with Jenkin

Objective- Deploy code build to Snarqube via Jenkins using Sonar-scanner plugin

 1. Add jacoco plugin to your core project pom.xml so that Junit coverage report can be analysed by Sonarqube. The snippet is given at the bottom. in this article.

2. Go to Sonarqube -> Projects -> New Project -> Enter Project Name -> Generate a login token 


3. Go to Jenkins -> Create a new Job
    a. Fill Source Code Management section
    b. Set Branches to build like */develop
   c. Set Build Triggers as "Poll SCM" with following schedule (Check for git change every 15 mins) 
       H/15 * * * *
   d. Check 
?
  f. In Build section, enter "pom.xml" and set goal as "clean install"


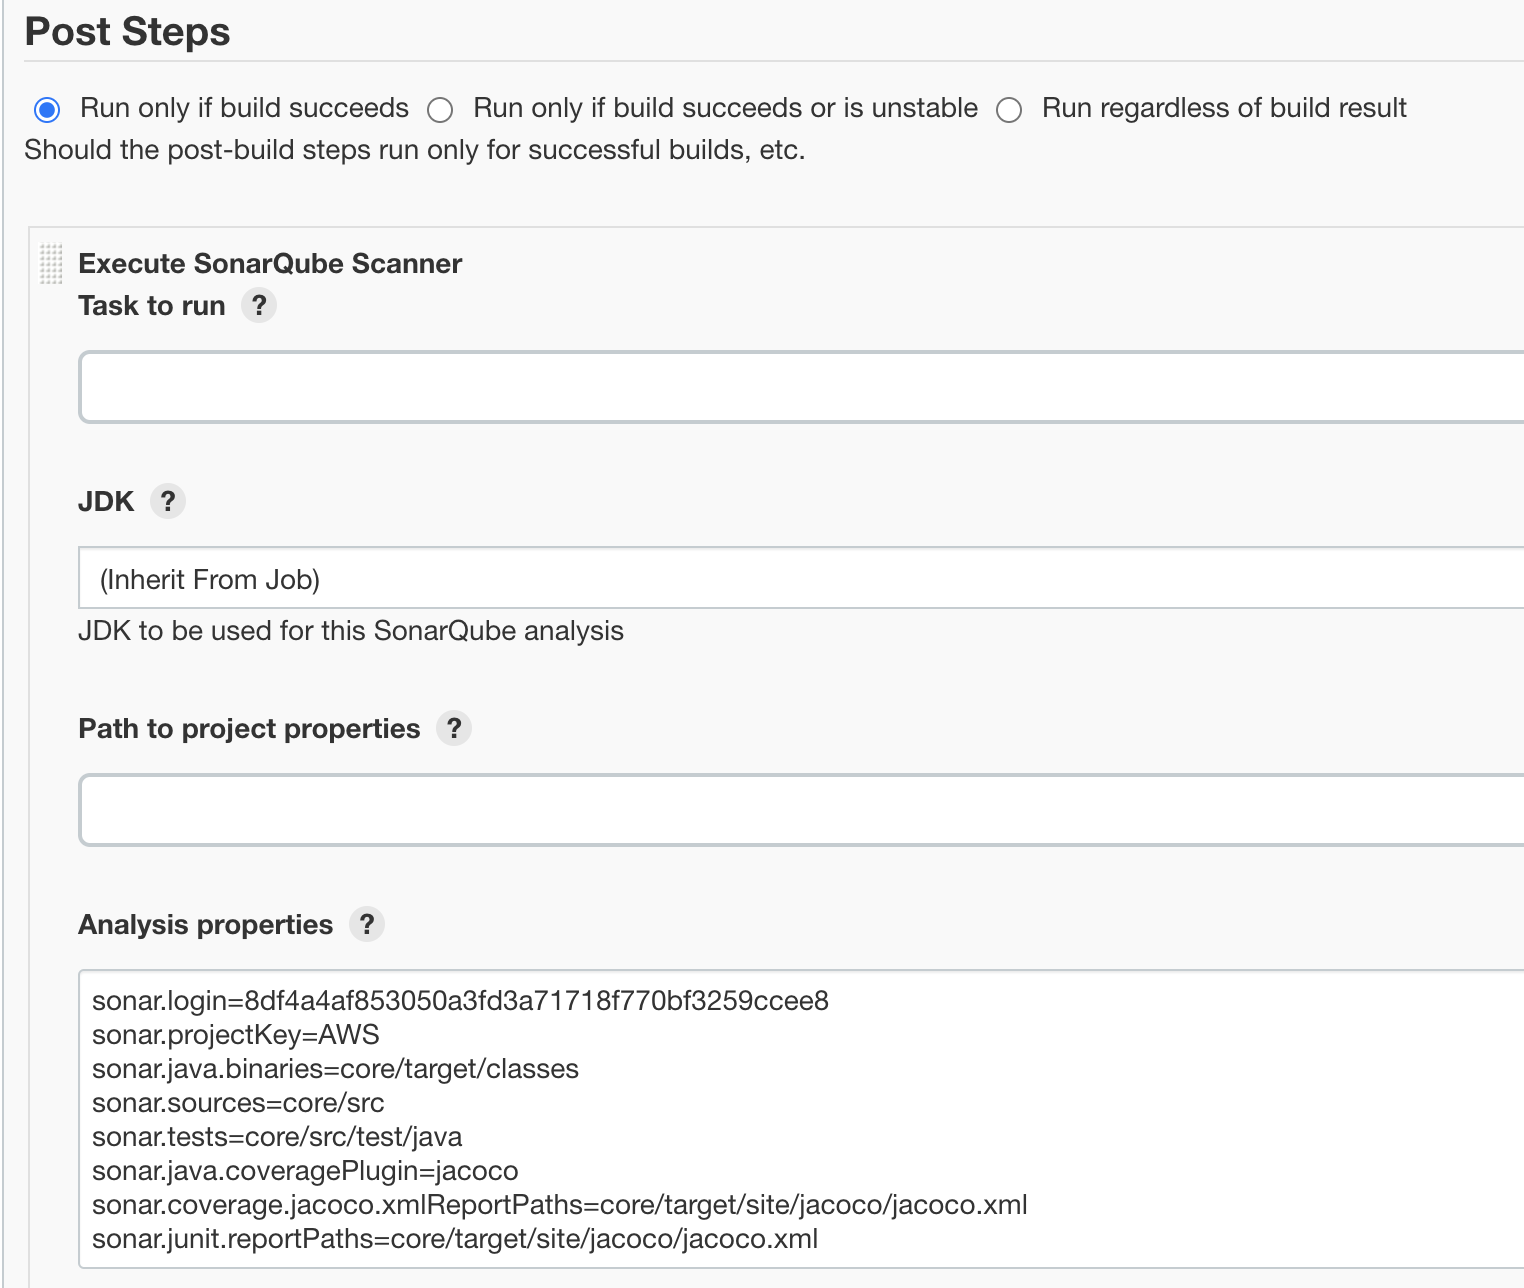
  g. In post step, Set 


 h. In "Add Post Build Step" dropdown select "Execute SonarQube Scnanner" option
 i. In the analysis property set as following:

sonar.login=yourlogin-token-from-step2-above
sonar.projectKey=your-project-name-from-step-2-above
sonar.java.binaries=core/target/classes
sonar.sources=core/src
sonar.tests=core/src/test/java
sonar.java.coveragePlugin=jacoco
sonar.coverage.jacoco.xmlReportPaths=core/target/site/jacoco/jacoco.xml
sonar.junit.reportPaths=core/target/site/jacoco/jacoco.xml


4. Once setup trigger the Jenkin job. Once build is successful, the code analysis will be sent to Sonarqube. Go to Sonarqube and check if a new project appears on your dashboard.


CDN | Clearing Cloudflare cache

In order to clear Cloudflare cache automatically via code, follow below steps: 1. Develop Custom TransportHandler Develop a custom Trans...